


Felted Dinnerplate Beret: Version 2
So I am supposed to do a hat update, but I left my bag at a friend's house. The bag which holds the hats >.< Instead I will post a second version of the same pattern.
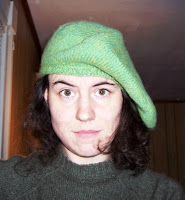
Apologies for having my ugly mug modeling all these hats. They are all knitted in my size and my roommates don't appreciate knitting (how sad is that?!)
Dinnerplate Beret, Version 2
This is basically the same hat as before, but knit top down instead of rim up. This has quickly become my favorite version of the pattern for several reasons:
1. I dislike DPNs and I don’t like knitting hats on Magic Loop. So I would rather get the DPNs out of the way first and then knit the rest peaceably on a circular needle.
2. Some yarns run out right about at the hatband area… it’s easy to swap them out and knit a contrast hatband. Economical and prevents a buying a second skein or knitting a doofy looking circle at the top of your hat
The pictures are:

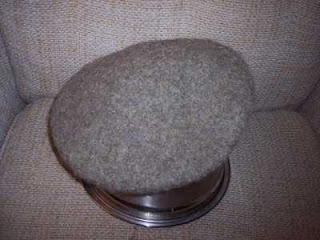
Noro Kureyon, felted.
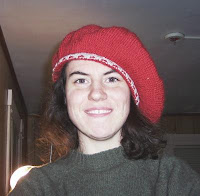
Brown Sheep Lamb’s Pride, unfelted.
Cascade 220, felted

Classic Elite Inca Alpaca, felted.
As you can see, not felting the hat gives you a Scots Bonnet type hat rather than a tight beret. These were all knit up to 25 stitches per wedge, and down to 12, on size 7 needles.
Materials: About 200 yds of worsted weight, feltable yarn. (Superwash wool does not work. So far what has worked is: (in order of tightest felting to loosest felting)
Classic Elite Inca Alpaca
Araucania Atacama Nature Alpaca.
Plymouth Galway (felts surprisingly well)
Berroco Ultra Alpaca
Cascade 220
Plymouth Boku
Brown Sheep Lamb’s Pride
Paton’s Classic Wool
Lion Brand Fisherman’s wool
Noro Kuryeon (Requires 3 skeins)
Reynold’s Lite Lopi
That should give you an idea of what is out there that may work.
1 Size 7 16” circular needle (or size required for gauge)
1 set of size 7 DPNs (or size required for gauge)
optional 1 size 5 16” circular needle (for a better fitting hatband on an unfelted bonnet)
8 stitch markers (1 should be a different color from the other 7)
Yarn Needle
11” inch dinnerplate (preferably plastic) for a felted hat.
~*~*~*~*~
Gauge: US size 7 (20 stitches; 26 rows = 4inchesx4inches)
Gauge is not extremely crucial for a felted hat, but it greatly helps if you are close. If you are having problems, err on the larger rather than the smaller side. Even for an unfelted hat you can still put it in the dryer for a few minutes and shore it up. It’s awfully darn hard trying to stretch a too-small hat.
~*~*~*~*~*~*~
Sizes are listed as Small (Medium) [Large]
Small fits most adolescents. Medium is an adult female (and every hat pictured). Large is for an adult Man.
If you plan on making the hat unfelted, choose one size smaller. There are also notes at the very bottom for custom fitting the hat to your head.
~*~*~*~*~*~*~
A note on increases: if you intend to felt the hat, you can pretty much use whichever increase you feel the most comfortable with because the resulting felted fabric will blur stitch definition. If you do not intend to felt the hat, consider using a right lifted increase or an invisible increase to create a clean line.
When I felt these hats I use the bar increase because I can knit it in my sleep (and in the dark, which is helpful when knitting through movies)
For ease of the pattern, increases are written as: RLI (standing for Right Lifted Increase)

 (This is the Lite Lopi hat)
~*~*~*~*~*~*~
1. Using whatever method you like, cast on 8 stitches to one of the DPNs, leaving a 8” tail of yarn at the end.
2. Turn work, using the bar increase, increase once in every stitch (16 stitches)
3. Spread these 16 stitches out evenly over 4 DPNs [trust me, you’re knitting 8 wedges, 4 DPNs makes things much easier than 3]
4. Join for circular knitting. Knit one row even (16 stitches)
5. *k1, RLI, PM (Place Marker), RLI, k1* Repeat from * around on each DPN. You should have 4 markers placed in the center of each DPN, and 24 stitches creating 8 wedges (2 per DPN) with 3 stitches each.
6. Knit one row even
7. Increase one stitch per wedge. (If you increase in the same place every wedge you will end up with clear spiraling lines at the top of your beret. If you don’t want the lines to appear, change where you place you increases every round)
8. knit one row even
9. Repeat steps 7 and 8, increasing one stitch in each wedge every odd row, until you have 10 stitches on each wedge. Knit stitches off of the DPNs and on to the circular needles if you so desire, placing markers at the break between each DPN, and the different colored marker at the place that marks the end of each row.
10. Repeat steps 7 and 8, increasing one stitch in each wedge every odd row until you have 21 (25) [28] stitches per wedge. 168 (200) [224] stitches total. End knitting one row even.
11. *Knit 1, k2tog, knit 18* Repeat from * around. 20 (24) [27] stitches per wedge. You will be decreasing one stitch per wedge on subsequent odd rows.
12. Knit one row even.
13. Repeat Steps 11 and 12 until you have 10 (12) [14] stitches per wedge. 80 (96) [112] stitches in total.
14. If you plan on making an unfelted hat, switch to using the smaller sized needles. If you would like a contrasting hatband switch to contrast color. Work 4 rows of K2, P2 ribbing
15. Purl one row even.
16. Work 4 rows of K2, P2 ribbing
17. bind off.
18. Run the cast on tail through the first 8 stitches at the top of the hat and pull tightly to close up hole.
19. Thread the yarn needle with a length of yarn, and fold the K1,P1 ribbing up at the purl row. Sew the two bands together in an elastic seaming stitch to create a double-thick band.
If you are not felting you hat, celebrate because you’re done! If you are, read on:
20. Fill your washing machine with a ½ load of cotton laundry (towels, jeans and/or t-shirts work well. You need the extra stuff in there to increase the agitation). Set the machine to heavy soil (don’t use the delicate cycle!), the water level between medium and high; and the water temperature to HOT. Put in a ¼ to a ½ measure full of laundry soap. (To protect the hat, use soap without bleach or additives. Ivory flakes are the best if you can find them). Throw your hat in there with the laundry and let ‘er rip.
21. Check the hat ½ way through the wash; and again at ¾ of the way. Alpaca can felt very quickly. The goal is to felt it all the way down until the stitches disappear into fabric. If in doubt, put it back in. Stop if the hat shrinks so small that it won’t ever fit around your head.
22. Take the hat out. When first out of the wash it will looks like a wrinkled, tiny, matted mess. Don’t worry. Grab your dinnerplate!
23. Stretch your hat over the dinnerplate, and adjust so you get one flat round side, and so the head opening is centered on the other side. While it is still wet you can stretch the head hole larger or smaller and shape it with your fingers until it is the size and shape you want it to be.
24. Let your hat dry – it will take between 24-36 hours to get it completely dry. You can touch it and flip it over halfway through, but don’t be tempted to take it off of its plate too early! It has to completely dry in order to retain the nice shape you stretched it into.
25. When its dry, take the hat off the dinnerplate carefully, and viola! Hat!

 (Inca Alpaca)
~*~*~*~*~*~
Pattern sizing notes for the unfelted version: This pattern can easily be custom sized by increasing or decreasing the number of stitches per wedge at the widest point and at the brim. If you wanted a truly massive renaissance-like pancake beret you could increase all the way to 30 or 35 stitches per wedge. If you wanted a very petite baby hat, you can stop increasing at 18 or fewer stitches per wedge. The same is true with the brim. The caveat here is if you knit a larger hat you will need a larger dinnerplate.
If you want to custom fit the brim of your hat, transfer the stitches to a piece of scrap yarn as a holder, or a 32” (or wider) circular needle and pull it over your head. Knit down to the point where it is snug, and then start the ribbing.

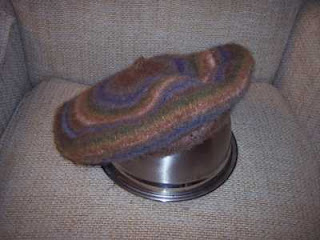 (Noro Kureyon)
Apologies for having my ugly mug modeling all these hats. They are all knitted in my size and my roommates don't appreciate knitting (how sad is that?!)
Dinnerplate Beret, Version 2
This is basically the same hat as before, but knit top down instead of rim up. This has quickly become my favorite version of the pattern for several reasons:
1. I dislike DPNs and I don’t like knitting hats on Magic Loop. So I would rather get the DPNs out of the way first and then knit the rest peaceably on a circular needle.
2. Some yarns run out right about at the hatband area… it’s easy to swap them out and knit a contrast hatband. Economical and prevents a buying a second skein or knitting a doofy looking circle at the top of your hat
The pictures are:
Noro Kureyon, felted.
Brown Sheep Lamb’s Pride, unfelted.
Cascade 220, felted
Classic Elite Inca Alpaca, felted.
As you can see, not felting the hat gives you a Scots Bonnet type hat rather than a tight beret. These were all knit up to 25 stitches per wedge, and down to 12, on size 7 needles.
Materials: About 200 yds of worsted weight, feltable yarn. (Superwash wool does not work. So far what has worked is: (in order of tightest felting to loosest felting)
Classic Elite Inca Alpaca
Araucania Atacama Nature Alpaca.
Plymouth Galway (felts surprisingly well)
Berroco Ultra Alpaca
Cascade 220
Plymouth Boku
Brown Sheep Lamb’s Pride
Paton’s Classic Wool
Lion Brand Fisherman’s wool
Noro Kuryeon (Requires 3 skeins)
Reynold’s Lite Lopi
That should give you an idea of what is out there that may work.
1 Size 7 16” circular needle (or size required for gauge)
1 set of size 7 DPNs (or size required for gauge)
optional 1 size 5 16” circular needle (for a better fitting hatband on an unfelted bonnet)
8 stitch markers (1 should be a different color from the other 7)
Yarn Needle
11” inch dinnerplate (preferably plastic) for a felted hat.
~*~*~*~*~
Gauge: US size 7 (20 stitches; 26 rows = 4inchesx4inches)
Gauge is not extremely crucial for a felted hat, but it greatly helps if you are close. If you are having problems, err on the larger rather than the smaller side. Even for an unfelted hat you can still put it in the dryer for a few minutes and shore it up. It’s awfully darn hard trying to stretch a too-small hat.
~*~*~*~*~*~*~
Sizes are listed as Small (Medium) [Large]
Small fits most adolescents. Medium is an adult female (and every hat pictured). Large is for an adult Man.
If you plan on making the hat unfelted, choose one size smaller. There are also notes at the very bottom for custom fitting the hat to your head.
~*~*~*~*~*~*~
A note on increases: if you intend to felt the hat, you can pretty much use whichever increase you feel the most comfortable with because the resulting felted fabric will blur stitch definition. If you do not intend to felt the hat, consider using a right lifted increase or an invisible increase to create a clean line.
When I felt these hats I use the bar increase because I can knit it in my sleep (and in the dark, which is helpful when knitting through movies)
For ease of the pattern, increases are written as: RLI (standing for Right Lifted Increase)
(This is the Lite Lopi hat)~*~*~*~*~*~*~
1. Using whatever method you like, cast on 8 stitches to one of the DPNs, leaving a 8” tail of yarn at the end.
2. Turn work, using the bar increase, increase once in every stitch (16 stitches)
3. Spread these 16 stitches out evenly over 4 DPNs [trust me, you’re knitting 8 wedges, 4 DPNs makes things much easier than 3]
4. Join for circular knitting. Knit one row even (16 stitches)
5. *k1, RLI, PM (Place Marker), RLI, k1* Repeat from * around on each DPN. You should have 4 markers placed in the center of each DPN, and 24 stitches creating 8 wedges (2 per DPN) with 3 stitches each.
6. Knit one row even
7. Increase one stitch per wedge. (If you increase in the same place every wedge you will end up with clear spiraling lines at the top of your beret. If you don’t want the lines to appear, change where you place you increases every round)
8. knit one row even
9. Repeat steps 7 and 8, increasing one stitch in each wedge every odd row, until you have 10 stitches on each wedge. Knit stitches off of the DPNs and on to the circular needles if you so desire, placing markers at the break between each DPN, and the different colored marker at the place that marks the end of each row.
10. Repeat steps 7 and 8, increasing one stitch in each wedge every odd row until you have 21 (25) [28] stitches per wedge. 168 (200) [224] stitches total. End knitting one row even.
11. *Knit 1, k2tog, knit 18* Repeat from * around. 20 (24) [27] stitches per wedge. You will be decreasing one stitch per wedge on subsequent odd rows.
12. Knit one row even.
13. Repeat Steps 11 and 12 until you have 10 (12) [14] stitches per wedge. 80 (96) [112] stitches in total.
14. If you plan on making an unfelted hat, switch to using the smaller sized needles. If you would like a contrasting hatband switch to contrast color. Work 4 rows of K2, P2 ribbing
15. Purl one row even.
16. Work 4 rows of K2, P2 ribbing
17. bind off.
18. Run the cast on tail through the first 8 stitches at the top of the hat and pull tightly to close up hole.
19. Thread the yarn needle with a length of yarn, and fold the K1,P1 ribbing up at the purl row. Sew the two bands together in an elastic seaming stitch to create a double-thick band.
If you are not felting you hat, celebrate because you’re done! If you are, read on:
20. Fill your washing machine with a ½ load of cotton laundry (towels, jeans and/or t-shirts work well. You need the extra stuff in there to increase the agitation). Set the machine to heavy soil (don’t use the delicate cycle!), the water level between medium and high; and the water temperature to HOT. Put in a ¼ to a ½ measure full of laundry soap. (To protect the hat, use soap without bleach or additives. Ivory flakes are the best if you can find them). Throw your hat in there with the laundry and let ‘er rip.
21. Check the hat ½ way through the wash; and again at ¾ of the way. Alpaca can felt very quickly. The goal is to felt it all the way down until the stitches disappear into fabric. If in doubt, put it back in. Stop if the hat shrinks so small that it won’t ever fit around your head.
22. Take the hat out. When first out of the wash it will looks like a wrinkled, tiny, matted mess. Don’t worry. Grab your dinnerplate!
23. Stretch your hat over the dinnerplate, and adjust so you get one flat round side, and so the head opening is centered on the other side. While it is still wet you can stretch the head hole larger or smaller and shape it with your fingers until it is the size and shape you want it to be.
24. Let your hat dry – it will take between 24-36 hours to get it completely dry. You can touch it and flip it over halfway through, but don’t be tempted to take it off of its plate too early! It has to completely dry in order to retain the nice shape you stretched it into.
25. When its dry, take the hat off the dinnerplate carefully, and viola! Hat!
(Inca Alpaca)~*~*~*~*~*~
Pattern sizing notes for the unfelted version: This pattern can easily be custom sized by increasing or decreasing the number of stitches per wedge at the widest point and at the brim. If you wanted a truly massive renaissance-like pancake beret you could increase all the way to 30 or 35 stitches per wedge. If you wanted a very petite baby hat, you can stop increasing at 18 or fewer stitches per wedge. The same is true with the brim. The caveat here is if you knit a larger hat you will need a larger dinnerplate.
If you want to custom fit the brim of your hat, transfer the stitches to a piece of scrap yarn as a holder, or a 32” (or wider) circular needle and pull it over your head. Knit down to the point where it is snug, and then start the ribbing.
(Noro Kureyon)Labels: beret, felt, free pattern, hat
posted by JamieL | 8:46 PM
![]()
![]()
6 Comments:
Sweet. Nice posting with clear directions and good photos. This is very helpful. Thanks!
Thanks for sharing your pattern. I think my daughter will like wearing your beret.
Thanks, Jamiel. I am an old knitter returning to the fold, so to speak, and googled "beret" and your site came up. Very clear instructions and good pictures. Thank you,
Vera in Florida
Hi JamieL
Hoopy berets ! I've just started one. As Vera says, thanks for the easy to follow instructions and the photos.
Win awards :)
Hi Jamie - I used your pattern to knit a medium size felted beret with some hand-dyed Cascade 220 and it turned out really nicely. I've just done another beret, aiming for something reminiscent of a French or Che style using black C220. I knitted the top to your small size, then added four extra rows to round out the side, then decreased to the brim for your large size (this hat is for a 59cm head size). I used the starting tail to make a little plat on top of the beret to form the little bobbly bit. I felted it and voila ! Very nice French beret.
Can you please explain what you mean in section 19 by "elastic seaming stitch?" I can't find this referenced or explained anywhere.
Thanks!
Post a Comment
<< Home